Cat's Cradle
Dear quilting world -- we need to talk. Now. We need to talk about why an amazing, comprehensible, gorgeous pattern isn't ragingly popular. Say hello to the Carpenter's Square pattern.
I don't have to sell you on this pattern, because it sells itself. It's a striking, unforgettable design, more so because it's not being made very often due to lack of patterns. Odder still: this pattern is old. By leaning on the research of others, small variants on this pattern appear to date back to at least 1880-1890. Some examples:
- Circa 1890, Pennsylvania
- Circa 1880, Ohio
- Circa 1880, Pennsylvania
- Circa 1890, location unknown
- Circa 1860, location unknown
- Circa 1880-1900, location unknown
Oddest of all? Very few people are making quilts from this design, which is madness, because this pattern's quite reasonable if you have a rotary cutter and a couple of good rulers.
First, a disclaimer
If a pattern was available for sale, I'd point you to it. It's not. Georgia Bonesteel published a pattern in her Spinning Spools series back in 1990. You can buy it secondhand by searching for carpenter's square block on eBay. That's what I did, and when I read through it I discovered the pattern's useless for rotary cutting, but it can be used as a blueprint. If it makes you feel good to buy a copy, go right ahead. Unfortunately, it doesn't look like the original author will benefit. C'est la vie.
Next, a second disclaimer
We're all adults here. You're here because you want something different, and you're willing to work for it. Great. I'm going to give you the basics, but you need to figure your own yardage, and settle on the finished size you want.
The original pattern
According to the pattern, this is what the block looks like, as well as how to piece it. I have one piece of advice for you. DON'T. No no no. Not like this:
 Carpenter's Square: original block depiction
This approach is wasteful with your background fabric (go on, figure out how to cut the corner pieces) and requires you to fit angles together perfectly between huge blocks. There's an easier way.
How to adapt it
For the purposes of my pattern explanation, and my photos, my background fabric was white, and my foreground fabric was blue.
You're going to make three types of pieces:
- Plain background fabric. You'll need squares and triangles. More on that later.
- Strip set A: 3 foreground (blue) strips, 2 background (white) strips. You'll need more of this strip set than strip set B.
- Strip set B: 3 background (white) strips, 2 foreground (blue) strips.
Your magic numbers are 1¾ inches and 6¾ inches.
All strips for your strip sets should be 1¾" x width of fabric. Press them with your seams toward the darker fabric. You'll find they nest beautifully.
You will be making two types of blocks: the easy block, and the complex block.
Making the complex block
For this block, you will need both strip sets A and B. From both sets, you will cut off slices that are 1¾ inches wide:
- 12 pieces from strip set B (3 background / 2 foreground), each 1¾ inches wide
- 8 pieces from strip set A (3 foreground / 2 background), each 1¾ inches wide
- 4 longer pieces from strip set A (3 foreground / 2 background), 6¾ inches wide
- 1 plain square of background fabric, 6¾ inches
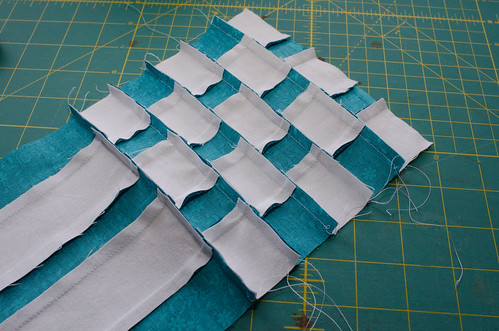
Build 4 checkerboards. Each checkerboard will have 3 of set B, and 2 of set A. Join them together with the longer A pieces, and a plain square, to make this piece:
 Carpenter's Square quilt: the complex block
Swirl your seams toward the darker color. Pin before you sew; this pattern looks terrible if you aren't accurate. Press your block when you're done. Measured diagonally, It should be in the 25-26" range.
Making the simpler block
I might have lied slightly. This block comes together faster, but it's more finicky to cut, and I don't have an exact measurement for you.
For this block, you'll need:
- 5 plain squares of background fabric, each 6¾ inches
- Strip set A (3 foreground / 2 background), for cutting triangles
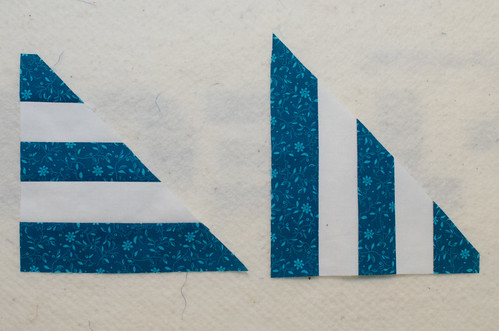
You need two types of triangles, and they need to be long enough so you can seam the triangles together to get a ... you guessed it ... 6¾ inch square. They have to be cut a certain way, and you need to remember to leave yourself plenty of seam allowances. The two types of triangles you need from strip set A look like this:
 Carpenter's Square pattern: triangles
You'll need 4 of each type of triangle, and you will seam them together, like this:
 Carpenter's Square quilt: how the triangles fit
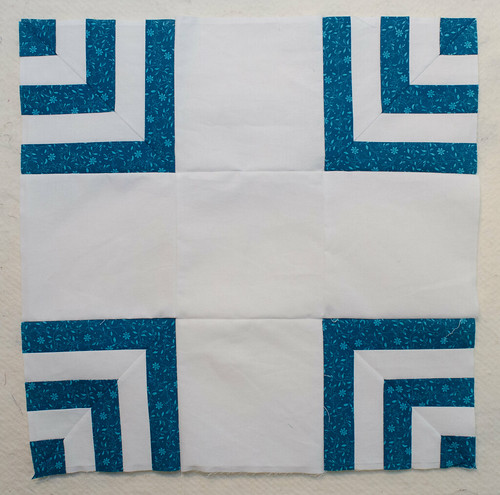
Believe it or not, this part is as hard as the pattern gets. Honest. As long as you pressed your strip sets before working with them, you can pin them and get nice, neat joins. Your eyes will be drawn to these joins, so take your time and get them right. You will make four seamed squares, and join them with five plain squares to get this piece:
 Carpenter's Square quilt: the simple block
Remember, when you're sewing, the bull's-eye part of the seamed square always points outward.
Except for the edge pieces (and I have a recommendation about that, see below) ... that's it. Those are the only two pieces. Seriously. That's ALL.
Assembly
To get the look of the old pattern, these blocks should be sewn on point -- meaning, corner, not edge, points up. The original version of this pattern required you to do diagonal seams inside the blocks to get a square block that looked on point, but wasn't. I found matching the foreground stripes at the bottom of those big blocks to be more trouble than it was worth, plus cutting weird corner pieces to make a square block seemed silly. Why not just turn the pattern 45°, split it into two major blocks, and make it easier to assemble?
I would recommend one specific design choice, though. You'll need to fill in the edges of your quilt with half-blocks to have a quilt top with straight edges. I would strongly recommend your half-blocks be from the simpler block, not the complex block, because it splits beautifully into a triangle:
- one seamed square,
- 2 plain squares
- 1 of each of the triangles sliced from strip set A
- a half-square triangle
In comparison, making your half-block from the complex block will require you to make partial checkerboards, which seems annoying to me.
Since the blocks are roughly 25"-26" on the diagonal, a 3x3 grid, when filled in, gives you about a 75"x75" quilt if you don't add any sashing or borders.
Seriously, you can do this.
...and I'm going to make a couple of requests of you, if you do.
First, please don't sell this pattern. It's over a century old. If you calculate the triangle sizes for the edge and corner pieces, let me know and I'll update this post. This pattern is beautiful and deserves to be seen and loved and done by quilters everywhere.
Second, I want you to take a moment. Give some thought to how art and artistry work in Western society.
Somewhere out there, in Ohio, in Pennsylvania, in farmhouses and towns somewhere not too long after the Civil War, there were women -- almost certainly, women -- who made quilts based off of these patterns. The few instances of Carpenter's Square quilts that survive from the 19th century are collector's items. Works of art, even: and we do not know the names of their creators. We know the names of painters -- mostly male -- going back centuries. We know their names and their lives. These pieces of art were made by women whose names and stories we lost in just over a century.
Treat your work like the art it is, and sign your name to it. We lost the names of generations of quilters because what they did wasn't considered "art." Make beautiful things, and let's ensure we don't lose any more names.
- Log in to post comments


Comments
How much of each fabric did
How much of each fabric did you use? It looks wonderful by the way!
I actually don’t know. I
I actually don't know. I worked on the quilt off and on for a couple of months, and didn't keep track.
A pattern for this design
A pattern for this design made in browns (called Baked Alaska) is available in a book by Martingale's Patchwork Place titled "On-Point Quilts: Designs on the Diagonal" by Retta Warehime. It was published in 2008. I believe it is still in print because I bought my copy about a year and a half ago.
Hey, that’s useful info! I
Hey, that's useful info! I looked it up and it looks like the same block ... minor grumble at not referencing the traditional name of the block, which is why I never found this pattern in my searching.